Manual
HD Overhead Door
Version 2018.03.22
Open Overhead Door Changelog
Report A Bug
INDEX:
0) Welcome
Thank you for your purchase of the HD Overhead Door.
This is a collaboration project between HD Emergency Equipment and Supplies and S² - Roleplay, Live, Play.
Special care has been taken to perfectly mirror the movements of a real overhead door;
to give plenty of detail & high quality textures; various customization options;
a properly implemented LOD (Level of Detail); low land impact and an easy setup process.
If you are experiencing any problems with your product, please be sure that you have read this manual in its entirety and you fully understand its contents.
If at any point this manual does not help you please join the HD Emergency Equipment and supplies or S2 - Roleplay, Live, Play group.
Simply start a new group chat with any questions you might have.
Alternatively you can also join the HD Discord Server and ask your question in the #helpdesk channel.
Texture Templates are available online.
We hope you enjoy your product from HD Emergency and S²! Thank you for the support!
1) Setup Guide
WARNING
IT IS NOT RECOMMENDED TO MAKE CHANGES TO A LINKED BUILDING OR PART OF THE DOORS WHILE THE DOORS ARE MOVING OR OPEN.
ONLY MAKE CHANGES WHILE THEY ARE STOPPED.
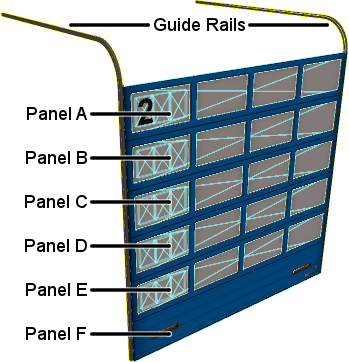
Each Overhead Door has One set of Guide Rails and Six Door Panels: A through F.IT IS NOT RECOMMENDED TO MAKE CHANGES TO A LINKED BUILDING OR PART OF THE DOORS WHILE THE DOORS ARE MOVING OR OPEN.
ONLY MAKE CHANGES WHILE THEY ARE STOPPED.
There are 4 different Panel types: Solid, Window, Freight, Base.
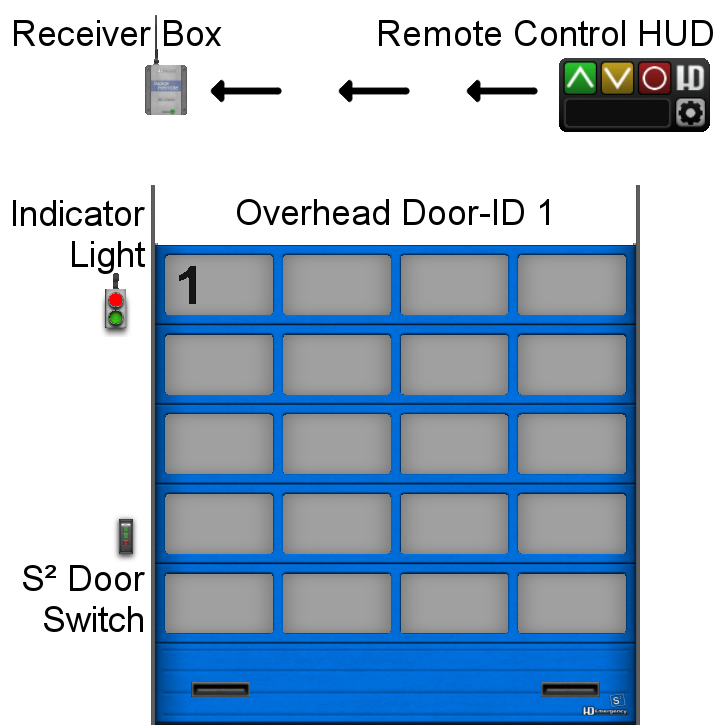
The primary way to control the HD Overhead Door is with the S2 Switches.
They also support Indicator Lights and a Receiver Box for Remote Controls.
The HD Overhead Door box that was delivered to you contains four pre-assembled sets:
- - HD Overhead Door Commercial
- - HD Overhead Door Freight
- - HD Overhead Door Basic Setup
- - HD Overhead Door Advanced Setup
Once you are familiar with how everything works you can explore further and assemble new Door Configurations.
1.1 Basic Setup
HD Overhead Doors can be linked together to create a Basic Setup.
All doors within the same linkset need to have unique Door-IDs.
You have to make sure that the root prim remains one of the Guide Rails.
The root prim is the prim that was selected last when linking a selection of prims together.
It has a yellow outline while all child prims have a blue outline.
The access to all doors will be automatically restricted to Owner and Group members only.
The group used is the one that the whole object is set to.
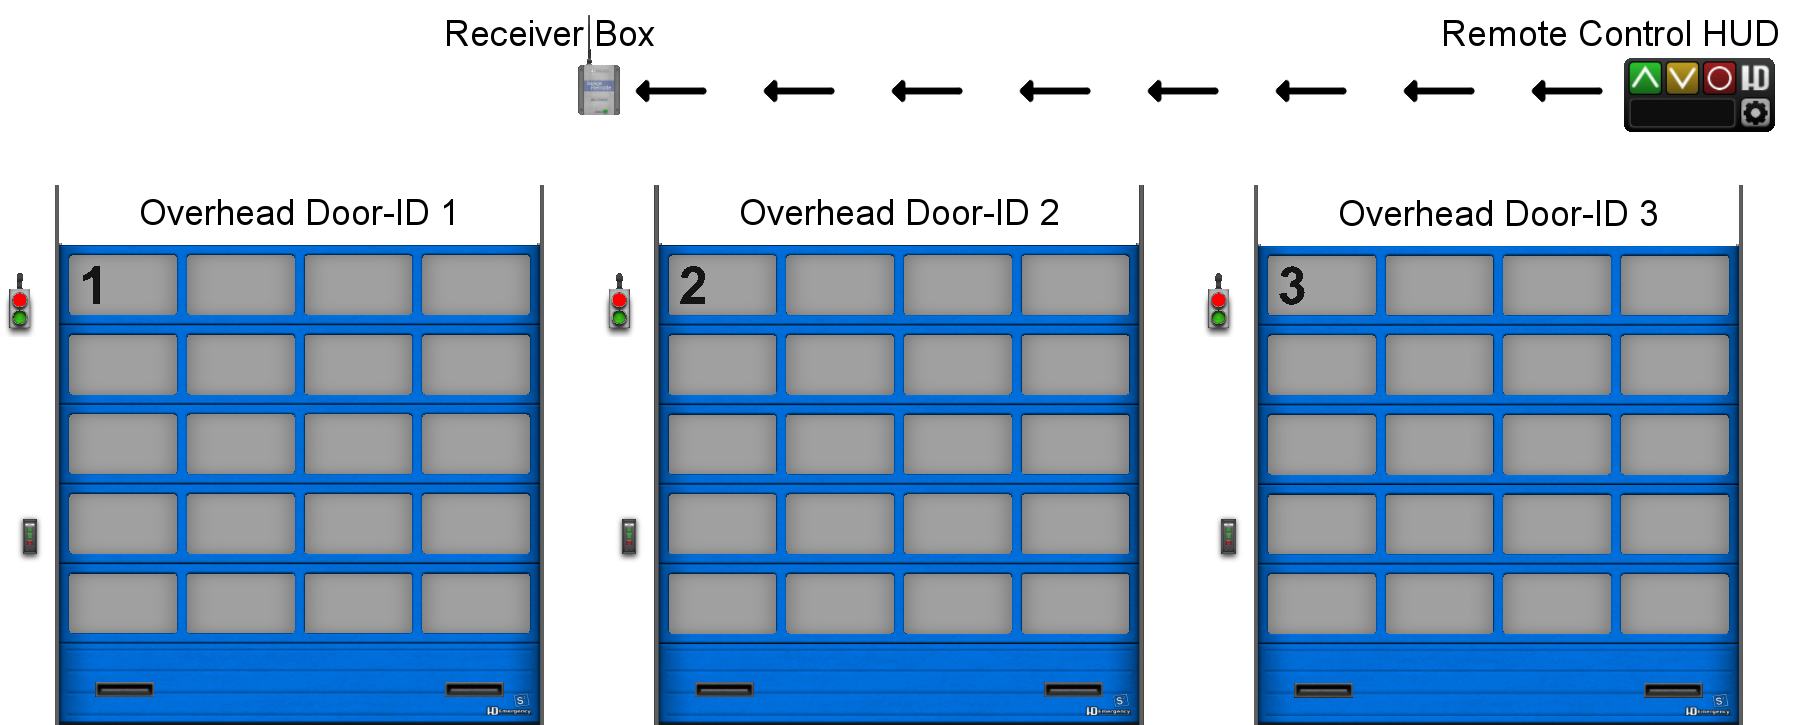
The Receiver Box is used as an easy way to use remote controls to open or close the HD Overhead Doors.
All doors within the same linkset need to have unique Door-IDs.
You have to make sure that the root prim remains one of the Guide Rails.
The root prim is the prim that was selected last when linking a selection of prims together.
It has a yellow outline while all child prims have a blue outline.
The access to all doors will be automatically restricted to Owner and Group members only.
The group used is the one that the whole object is set to.
The Receiver Box is used as an easy way to use remote controls to open or close the HD Overhead Doors.
INFO
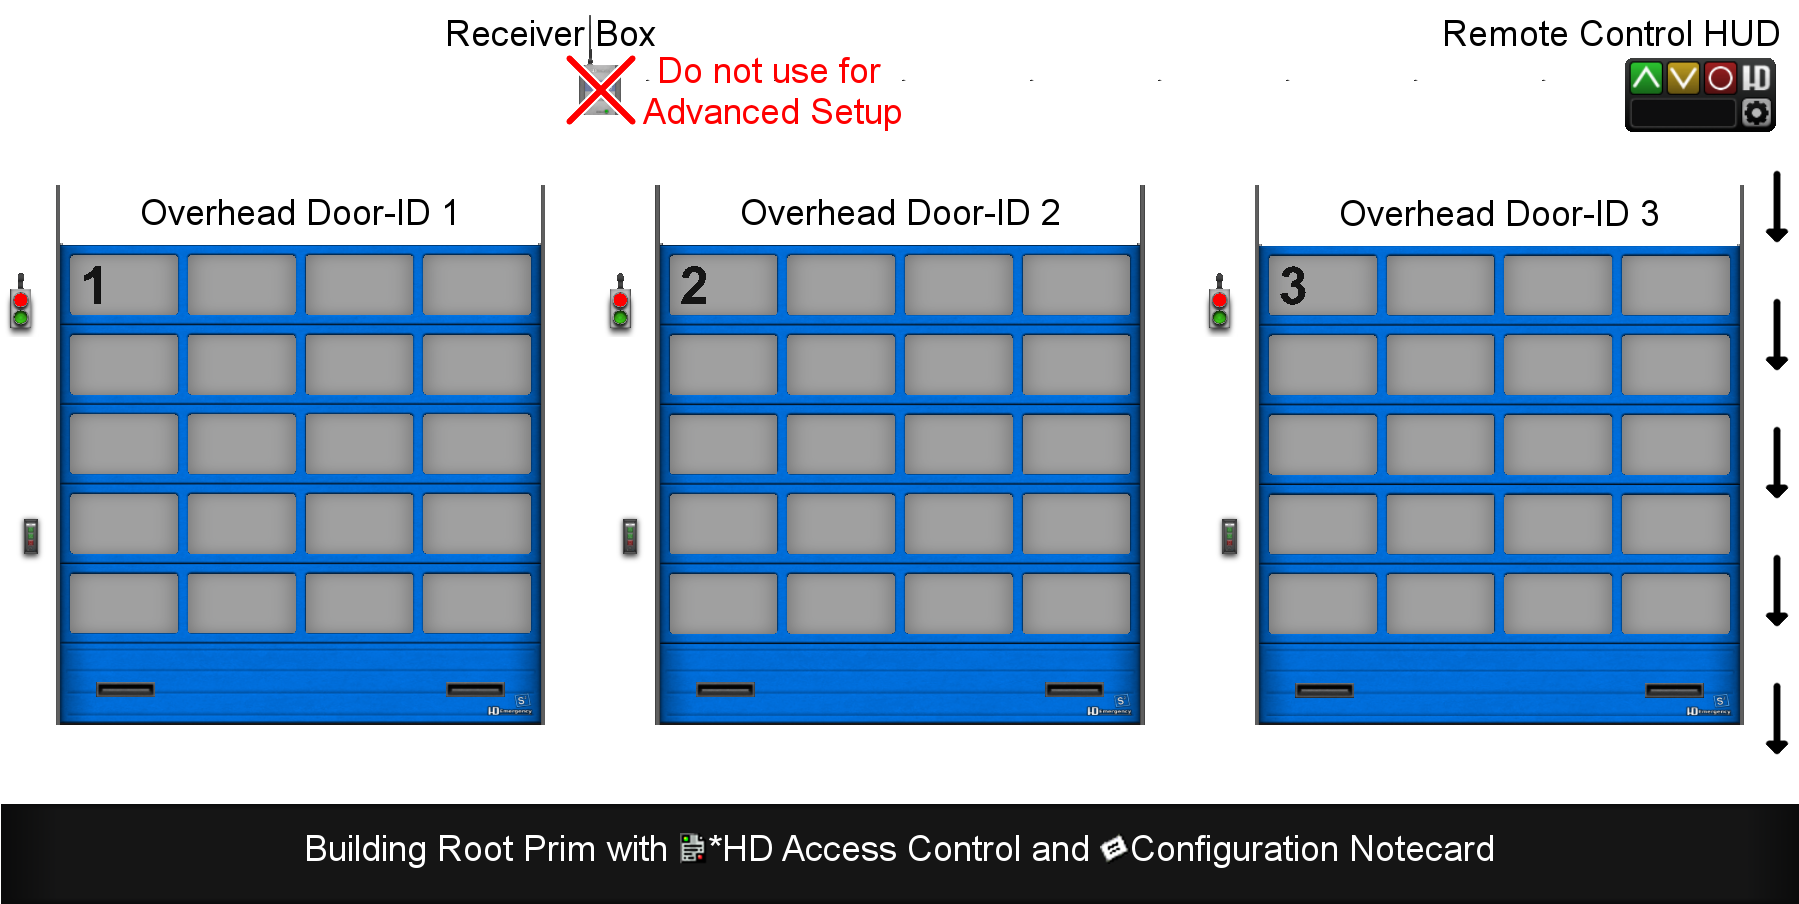
Please note that you can not use Advanced Mode and the Receiver Box at the same time.
If you use the Advanced Setup then please use the Script API in order to enable the use of Remote Controls.
Please note that you can not use Advanced Mode and the Receiver Box at the same time.
If you use the Advanced Setup then please use the Script API in order to enable the use of Remote Controls.
1.2 Advanced Setup
If linked to a building, the root prim of the building must contain the '*HD Access Control' Script.
The use of the control script allows for more advanced settings for both access and interaction.
A notecard is required to change the default settings. You can set a Script API channel, general access permissions and define a whitelist of avatars.
The following settings are possible:
Please make sure that each door within the linkset has a unique Door-ID.
You can also link switches and the garage indicator lights as needed.
Once done please copy the '*HD Access Control [Version-Number]' into the root prim of your linkset.
To use custom settings please also copy the 'Configuration Notecard' into the root prim of the linkset.
Open the notecard and make adjustments to the settings as needed.
The use of the control script allows for more advanced settings for both access and interaction.
A notecard is required to change the default settings. You can set a Script API channel, general access permissions and define a whitelist of avatars.
The following settings are possible:
-
ACCESS = GROUP
> sets the general access, can be OWNER, GROUP or ANYONE -
AVATAR = Lares Carter
> adds a single avatar to the whitelist, use multiple lines to add several avatars
> avatars can be entered via username or legacy name, display names can not be used
> avatars without last name can be entered with or without the default Resident last name
-
API = -4864231
> sets the Script API Channel -
RELAY = -5864231
> sets the Relay API Channel
Please make sure that each door within the linkset has a unique Door-ID.
You can also link switches and the garage indicator lights as needed.
Once done please copy the '*HD Access Control [Version-Number]' into the root prim of your linkset.
To use custom settings please also copy the 'Configuration Notecard' into the root prim of the linkset.
Open the notecard and make adjustments to the settings as needed.
2) Door-ID and Group-ID
2.1 Door-ID
Each HD Overhead Door is identified by its Door-ID. This can be any number between 1 and 100000.
If there is more than one door in a linkset then each door needs to have a unique Door-ID set.
Please make sure that each panel that belongs to the same HD Overhead Door has the same Door-ID set in its description.
Once all panels are properly setup you can use the Door Menu to easily change the Door-ID and all panels will update accordingly.
The guide rail prim has just the Door-ID set as description.
There are 6 panels for each HD Overhead Door. From top to bottom they have the suffix A to F.
The Panel Base always needs to be the bottom one.
You can put the other available panels in any order and arrangement you want.
If the top panel is a Panel Solid or a Panel Window and no Display# has been defined then the Door-ID will be displayed on the top left of it.
Only the first Three digits of the Door-ID can be displayed on the top panel.
You can set the Display Number to None if you do not wish to have any number visible.
Example:
Your set the Door-ID for your HD Overhead Door to 24 on the guide rails prim.
The first (top) panel has the description set to: 24A
The second one will be 24B. Then the next ones 24C, 24D, 24E and 24F.
The last panel of a door should always be a Panel Base which has the bottom liner and a different hinge and roller configuration.
The first (top) panel has the description set to: 24A
The second one will be 24B. Then the next ones 24C, 24D, 24E and 24F.
The last panel of a door should always be a Panel Base which has the bottom liner and a different hinge and roller configuration.
2.2 Group-ID
Additional to the Door-ID you can also set a Group-ID for each HD Overhead Door.
This can be any number between 1 and 100000. Each HD Overhead Door can only belong to one group at the same time.
The Group-ID can be used to control more than one HD Overhead Door simultaneously.
This can be any number between 1 and 100000. Each HD Overhead Door can only belong to one group at the same time.
The Group-ID can be used to control more than one HD Overhead Door simultaneously.
3) Options
3.1 Auto-Close Time
You can setup an Auto-Close Time for your HD Overhead Door. The auto-close time is given in minutes.
Just add your desired amount of time to the description of the Guide Rail.
Example:
Just add your desired amount of time to the description of the Guide Rail.
Example:
Your HD Overhead Door has the Door-ID 24 and you want to set the auto-close time to 10 minutes.
Then the description of the guide rail would be: 24, 10min
Then the description of the guide rail would be: 24, 10min
3.2 Speed Adjustment
You can modify the movement speed of your HD Overhead Door. The speed adjustment is given in percent.
Just add your desired amount of adjustment to the description of the Guide Rail.
Possible values are 10% up to 500%.
Example:
Just add your desired amount of adjustment to the description of the Guide Rail.
Possible values are 10% up to 500%.
Example:
Your HD Overhead Door has the Door-ID 24 and you want to set the speed to twice as fast.
Then the description of the guide rail would be: 24, 200%
Then the description of the guide rail would be: 24, 200%
3.3 Sensor Light
The HD Overhead Door is equipped with a Sensor Light that acts as Safety Guide to detect possible obstructions.
It is mounted approximately one half meter above the ground.
If the light beam is blocked then any closing door will be immediately stopped and forced to open again to avoid any personal injury or property damage.
Additionally an open door will not close while the light beam is blocked and a buzzing sound will be emitted if a switch is activated.
The Sensor Light can be deactivated for maintenance and debugging purposes.
HD Emergency takes no responsibility and shall not be held liable for
any vehicles that might be launched into the air and catapulted off-grid due to disabling the Sensor Light.
any vehicles that might be launched into the air and catapulted off-grid due to disabling the Sensor Light.
3.4 Reset
You can select Reset to force the HD Overhead Door to Validate all linked child prims and update all settings.
4) Customization
The HD Overhead Door offers various customization options. It is also modify enabled.
You can use the popup menu to browse various features.
The following options are available:
You can use the popup menu to browse various features.
The following options are available:
4.1 Display#
This option allows you to show a number on the top door panel other than the Door-ID.
Any number between 1 and 999 can be entered. You can leave it blank to show no number.
If the number is the same as the Door-ID then it will switch back to the Door-ID mode.
That means it will automatically update whenever the Door-ID is changed.
Any number between 1 and 999 can be entered. You can leave it blank to show no number.
If the number is the same as the Door-ID then it will switch back to the Door-ID mode.
That means it will automatically update whenever the Door-ID is changed.
4.2 Textures
Texture Front & Texture Back
You can enter the UUID of a compatible HD Overhead Texture.
Separate textures can be applied to front and back side of the panels.
The Doors come with a box of example textures which allow you to copy their UUIDs.
Full Templates in XCF and PSD File Format are available Online.
Texture Decal
Separate textures can be applied to front and back side of the panels.
The Doors come with a box of example textures which allow you to copy their UUIDs.
Full Templates in XCF and PSD File Format are available Online.
The Panel Base has a decal surface. There are 8 different options included with the menu.
You can choose ‘Clear’ in order to hide the decal.
If you select ‘Custom’ you may enter the UUID for any 4:1 ratio texture.
The texture should have a fully transparent background and be uploaded as PNG file.
You can choose ‘Clear’ in order to hide the decal.
If you select ‘Custom’ you may enter the UUID for any 4:1 ratio texture.
The texture should have a fully transparent background and be uploaded as PNG file.
4.3 Colors
Color Front & Color Back
If you are using the default white textures then you can use the color menu to apply a color tint.
Color Decal
This will apply a color tint to the Panel Base decal surface.
Color #
This will apply a color tint to the door number that is displayed in the top left corner of the top door panel.
Custom
Aside of the default colors you can also enter a custom color code.
Various formats are accepted:
Vector as ‘R G B’ or ‘R,G,B’ or ‘<R,G,B>’
Hex as ‘#RRGGBB’ or ‘0xRRGGBB’ or ‘RRGGBB’
Examples for Black:
Various formats are accepted:
Vector as ‘R G B’ or ‘R,G,B’ or ‘<R,G,B>’
Hex as ‘#RRGGBB’ or ‘0xRRGGBB’ or ‘RRGGBB’
Examples for Black:
| 0.082 0.082 0.082 | 0.082, 0.082, 0.082 | <0.082, 0.082, 0.082> |
| 21 21 21 | 21, 21, 21 | <21, 21, 21> |
| #800000 | 0x800000 | 800000 |
5) Validation Process
The HD Overhead Door relies on the link numbers of the door panels.
Every time the building is edited by linking or unlinking that order can possibly change.
Every time the linkset is modified the doors will be halted and the guide rail prim will switch to a red color.
The doors will automatically validate once a full minute has passed. The owner can also trigger a manual validation by clicking on the guide rails.
A validation is required after one of the following was changed:
- link order of the building
- local position or rotation
- size of the guide rails
- description of the guide rail
If a change in the setup fails to register properly you can simply unlink and relink one of the door panels.
An Indicator Light will only be recognized after a successful validation took place.
6) Resizing
The HD Overhead Door can be resized to almost any size. Please be aware that the Land Impact can increase if you make them larger than the default size.
Position the Guide Rail to the desired location then change the height and width as needed.
The depth of the guide rail will automatically adjust when the validation is complete.
Position the Guide Rail to the desired location then change the height and width as needed.
The depth of the guide rail will automatically adjust when the validation is complete.
7) S2 Garage Switches
The HD Overhead Doors are fully compatible with the S² Garage Switches Set.
The Buttons can be used to operate the HD Overhead Doors while standing within close proximity.
In order to setup your buttons:
- Set the description of the button to match the desired Door-ID.
- You can set a switch to a Door-ID by adding a G in front of the number. For example: G10 for Group-ID 10.
- You can set the description to -1 if you want the button to control all linked doors at the same time.
- Link the buttons prim to the same linkset as the door.
- Validate the linkset by clicking on the Guide Rail or wait for the auto-validation to kick in.
There are 5 styles available: Industrial, Default, Open-Only, Close-Only, Trigger
The buttons are labeled to indicate the function.
The three button versions have the following functions: Open, Close & Stop.
The single button version will only fulfill one of the functions.
Each button has a special label surface so you can easily show what it controls.
For the standard texture the horizontal scale has to be set to 0.50 and the vertical scale to 0.10.
The default labels have the following texture offsets:
You can also use your own custom label texture.
The Buttons can be used to operate the HD Overhead Doors while standing within close proximity.
In order to setup your buttons:
- Set the description of the button to match the desired Door-ID.
- You can set a switch to a Door-ID by adding a G in front of the number. For example: G10 for Group-ID 10.
- You can set the description to -1 if you want the button to control all linked doors at the same time.
- Link the buttons prim to the same linkset as the door.
- Validate the linkset by clicking on the Guide Rail or wait for the auto-validation to kick in.
There are 5 styles available: Industrial, Default, Open-Only, Close-Only, Trigger
The buttons are labeled to indicate the function.
The three button versions have the following functions: Open, Close & Stop.
The single button version will only fulfill one of the functions.
Each button has a special label surface so you can easily show what it controls.
For the standard texture the horizontal scale has to be set to 0.50 and the vertical scale to 0.10.
The default labels have the following texture offsets:
| Vertical | Horizontal -0.25 | Horizontal +0.25 |
| +0.45 | BAY | CLOSE ALL |
| +0.35 | GARAGE | OPEN ALL |
| +0.25 | STORAGE | OPEN ONLY |
| +0.15 | WAREHOUSE | CLOSE ONLY |
| +0.05 | PARKING | ENTRANCE |
| -0.05 | FRONT | EXIT |
| -0.15 | BACK | LEFT |
| -0.25 | SIDE | RIGHT |
| -0.35 | GATE | ALL DOORS |
| -0.45 | FREIGHT | TRIGGER |
8) S2 Garage Indicator Lights
You can link up to two S² Garage Indicator Lights per HD Overhead Door. Simply set the description of the Light to the correct Door-ID.
Please make sure that the name of the Light Prim still contains 'Garage Indicator' in it if you change it.
If the light is not registered correctly simply check that the description is correct and then unlink it and relink it.
The light will display a steady red while the door is closed. Once fully opened it will display a steady green.
While the door is moving it will flash red. If the door is stopped mid-travel it will display a steady red light.
You can easily adjust the colors of the indicator casing by applying a color tint.
9) Remote Controls
The HD Overhead Doors can be remotely controlled.
For the Basic Setup a Receiver Box is required. The Advanced Setup utilizes the Script API to enable Remote Controls.
For the Basic Setup a Receiver Box is required. The Advanced Setup utilizes the Script API to enable Remote Controls.
9.1 Receiver Box
The Receiver Box is an easy way to allow the use of remote controls without using the Advanced Setup.
Once linked simply click on the box to setup a communications channel.
The channel of the Receiver Box and the Remote Controls needs to match.
Once linked simply click on the box to setup a communications channel.
The channel of the Receiver Box and the Remote Controls needs to match.
9.2 Remote Control HUD
A basic Remote Control HUD is included with your HD Overhead Door.
The HUD has the following functions:
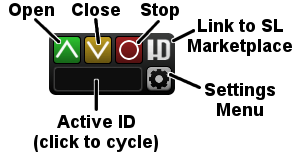
The Open, Close and Stop buttons have a broadcast range of 100 meters.
The settings menu contains these options:
Channel
The HUD has the following functions:
The Open, Close and Stop buttons have a broadcast range of 100 meters.
The settings menu contains these options:
Channel
Configures the communications channel for the Remote Control.
Add Door-ID
Adds a new Door-ID to the Remote Control. Door-IDs are shown in white.
You can click on the active ID to cycle through all saved IDs.
You can add up to a maximum of 10 Door-IDs and Group-IDs combined.
Add Group-ID
You can click on the active ID to cycle through all saved IDs.
You can add up to a maximum of 10 Door-IDs and Group-IDs combined.
Adds a new Group-ID to the Remote Control. Group-IDs are shown in blue.
You can click on the active ID to cycle through all saved IDs.
You can add up to a maximum of 10 Door-IDs and Group-IDs combined.
Remove ID
You can click on the active ID to cycle through all saved IDs.
You can add up to a maximum of 10 Door-IDs and Group-IDs combined.
Removes the currently active Door-ID or Group-ID.
You can also make your own Remote Control by using the Script API or use a compatible 3rd Party Product.10) Application Programming Interface (API)
The HD Overhead Doors need to use the Advanced Setup in order to utilize the available APIs.
10.1 Script API
The Script API will accept commands for the doors if the owner of the sending object has access to the door.
The basic format is: Command @ Door-ID
Command can be: OPEN, CLOSE. STOP or TRIGGER
OPEN - will open the door
CLOSE - will close the door
STOP - will stop any movement
TRIGGER - will stop the door if it is moving, otherwise start inverse movement
Example:
You set your Door-ID to 24.
You set the Script API to channel -4864231.
You use the following script line: llSay(-4864231,"OPEN@24");
It will cause the HD Overhead Door with the ID 24 to start opening.
10.2 Relay API
The Relay API will forward status information for any linked HD Overhead Door.
The basic format is: Status @ Door-ID
Status can be: OPENING, CLOSING. STOPPED, OPENED, CLOSED
OPENING - the door starts opening
CLOSING - the door starts closing
STOPPED - the door has stopped mid-travel
OPENED - the door fully opened
CLOSED - the door fully closed
Example:
You set your Door-ID to 24.
You set the Relay API to channel -5864231.
You used the S² Switch to open the door.
The root prim of the linkset will send the message 'OPENING' on channel -5864231.
11) Add-Ons
There are various Add-Ons available that are compatible with your HD Overhead Door.
S2 Garage Door Openers
S2 Alert Bell
Additional items can be used to add more detail to your Fire Station bay.
HD Electric Charging System
HD Exhaust Removal System
S2 Garage Door Openers
S2 Alert Bell
Additional items can be used to add more detail to your Fire Station bay.
HD Electric Charging System
HD Exhaust Removal System
12) Feedback
Please report all bugs, issues and feature suggestions via:
Instant Message or Notecard to Lares Carter.
Or the HD Website Forms for Suggestions and Bug Reports.
Thank you for your support.
Instant Message or Notecard to Lares Carter.
Or the HD Website Forms for Suggestions and Bug Reports.
Thank you for your support.
13) Credits
Mesh Model Overhead Door & Indicator Light - Lares Carter
Mesh Model S2 Switches - Seba Serpente
Textures & Sounds - Seba Serpente
Beta Testing - Seba Serpente & HD Beta Testing Group
Scripting - Lares Carter
Mesh Model S2 Switches - Seba Serpente
Textures & Sounds - Seba Serpente
Beta Testing - Seba Serpente & HD Beta Testing Group
Scripting - Lares Carter